

There are several functions can do data referencing: LOOKUP, VLOOKUP, HLOOKUP, MATCH, INDEX, and OFFSET. VLOOKUP and HLOOKUP are partly covered in this article (VLOOKUP and HLOOKUP functions). OFFSET function is covered in another article (Dynamic Referencing for Excel). This article primarily focuses on the MATCH and INDEX functions. This article primarily focuses on the MATCH and INDEX functions but also covers how the MATCH function can improve the uses of VLOOKUP and HLOOKUP functions.
MATCH function returns the relative position of the item in the range. The syntax of the MATCH function is:
MATCH(lookup_value, lookup_array, [match_type])
The MATCH function syntax has the following arguments:
lookup_value Required. The value that you want to match in lookup_array. The lookup_value argument can be a value (number, text, or logical value) or a cell reference to a number, text, or logical value.
lookup_array Required. The range of cells being searched.
match_type Optional. The number -1, 0, or 1. The match_type argument specifies how Excel matches lookup_value with values in lookup_array. The default value for this argument is 1.
Let’s look at below example:
File to download: Data Referencing.xlsx
Related articles: Dynamic Referencing for Excel, VLOOKUP and HLOOKUP functions, Create a Dropdown List by using Data Validation Command

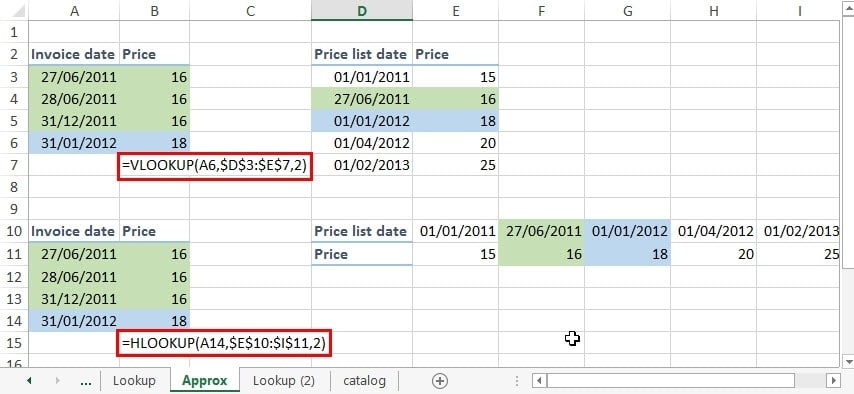
If I put in the formula =MATCH(B19,B4:H4,FALSE), it will return “5”. B19 is the parameter of the “Country” and “Brazil” is selected in this example. B4 to H4 is the range of the country name (from “USA” to “Germany”). The last argument “FALSE” indicates that I want a perfect match. Since “Brazil” is at the fifth column of the country name, the formula returns “5” as the result. I can combine the MATCH formula with either the VLOOKUP or INDEX to return the lookup value for a two dimension data referencing. The result of “5” is for the column argument for both VLOOKUP and INDEX function.
Let’s look at the VLOOKUP function first. The formula will be:
=VLOOKUP(B20,A4:H16,MATCH(B19,B4:H4,FALSE)+1,FALSE)
The VLOOKUP has these arguments :
VLOOKUP(lookup_value,table_array,col_index_num, [range_lookup])
So now the lookup_value is “August”, the table array is the data range from A4 to H16. Please note that the data range includes the country names and months. As a result, the col_index_number must be increased by one to “6” because the months are now the very first column instead of the data from USA. The last argument “FALSE” indicates that I want a perfect match.
With the combination of VLOOKUP and MATCH functions, now you can look up the value that matches the conditions of both country and month.
HLOOKUP function is very similar. Please refer to the “Data Referencing.xlsx” file for reference.
Both VLOOKUP and HLOOKUP have one major limitation. They only look up data on the left side or the lower side of the referencing data (i.e. the lookup values). You cannot put a negative value for either the col_index_num or row_index_num argument. That’s why I think the INDEX function is preferable to either LOOKUP function.
INDEX function has the following syntax:
INDEX (reference, row_num, column_num, area_num)
Reference A reference to one or more cell ranges.
row_num The number of the row in reference from which to return a reference.
column_num The number of the column in reference from which to return a reference.
area_num Selects a range in reference from which to return the intersection of row_num and column_num.
In this example, I used this formula:
=INDEX(B5:H16,MATCH(B20,A5:A16,FALSE),MATCH(B19,B4:H4,FALSE))

The first argument indentifies the range of data (cell B5: H16).
The second argument uses the MATCH function to locate the “month” of data that I want to get.
The third argument uses the MATCH function to locate the “country” of data that I want to get.
In this example, I don’t need to put in area_num argument.
In this example, I want the June data of Japan and the formula returns the value of $2,154.49.

To enhance the user experience on using this report, I added the dropdown list and the conditional formatting to make it more user-friendly and versatile. The creation of dropdown list can be found in this article (Create a Dropdown List by using Data Validation Command).

The conditional formatting is created to allow users to easily spot the correct value in the table.
Please follow these steps to create the conditional formatting:


Step 1: At the “Home” tab, click on the “Conditional Formatting” icon, choose “Highlight Cells Rules” and the “Equal to”.
Step 2: Select or input cell B21 which is the result of calculations from using the INDEX, MATCH, VLOOKUP, or HLOOKUP functions.
I prefer yellow highlight color than the pre-defined choices from Microsoft, so I choose “Custom Format…” choice.
In the “Format Cells”, click the “Fill” tab and choose the yellow color. Click “OK” button twice to apply the effect.